
CAS 的安装与配置 |
iServer 、iPortal 及 iEdge 支持基于 CAS 的单点登录。CAS(Central Authentication Service)是 Yale 大学发起的构建 Web SSO 的 Java 开源项目。用户配置单点登录时,需设置 CAS 认证服务器,CAS 认证服务器负责完成对用户信息的认定,可单独部署于网络环境中。配置使用 CAS 单点登录的过程具体请详见配置使用 CAS 单点登录。
要使用 CAS 单点登录,首先需要搭建 CAS 服务,这里主要介绍 CAS 3.X 和 CAS 5.X 的配置方法。
这里以在 Windows 系统中通过 cas-server-webapp-3.4.war 搭建 CAS 服务,并以 MySQL 作为存储用户信息的数据库为例进行说明。
从 http://www.apereo.org 下载 CAS 3.4 的安装包,然后将 cas-server-webapp-3.4.war 解压缩,解压缩的文件夹重命名为 cas,在 cas\WEB-INF\lib 中添加以下 jar 包,用于连接用户账户的数据库:
此外,还需要下载 cas-server-3.4-release.zip,然后将此 zip 包里 modules 文件夹中的 jar 包都添加到 cas\WEB-INF\lib 文件夹里(除了 cas-server-core-3.4.jar,因为 cas-server-webapp-3.4 里已经包含)。
修改 cas\WEB-INF\deployerConfigContext.xml,在其中添加以下配置:
<bean id="dataSource" class="org.springframework.jdbc.datasource.DriverManagerDataSource">
<!--根据用户账号保存的数据库类型决定-->
<property name="driverClassName" value="com.mysql.jdbc.Driver" />
<!--用户账号的数据库连接方式-->
<property name="url" value="jdbc:mysql://localhost:3306/iportalusers" />
<!--本地MySQL数据库的用户名和密码-->
<property name="username" value="root" />
<property name="password" value="root" />
</bean>
注释掉以下这行代码:
<!-- <bean class="org.jasig.cas.authentication.handler.support.SimpleTestUsernamePasswordAuthenticationHandler" /> -->
在<property name="authenticationHandlers">节点的<list>节点下,添加以下内容:
<bean class="org.jasig.cas.authentication.handler.support.HttpBasedServiceCredentialsAuthenticationHandler" p:httpClient-ref="httpClient" />
<bean class="org.jasig.cas.adaptors.jdbc.QueryDatabaseAuthenticationHandler">
<property name="dataSource" ref="dataSource" />
<property name="sql" value="select password from users where lower(user ) = lower(?)" />
</bean>
上述代码中粗体字段的含义如下:
修改 cas\WEB-INF\deployerConfigContext.xml,注释掉以下几行代码:
<!-- <bean id="attributeRepository" class="org.jasig.services.persondir.support.StubPersonAttributeDao">
<property name="backingMap">
<map>
<entry key="uid" value="uid" />
<entry key="eduPersonAffiliation" value="eduPersonAffiliation" />
<entry key="groupMembership" value="groupMembership" />
</map>
</property>
</bean> -->
添加以下配置:
<bean class="org.jasig.services.persondir.support.jdbc.SingleRowJdbcPersonAttributeDao" id="attributeRepository">
<!-- 指定使用的数据源,此处dataSource是已配置好的数据源 -->
<constructor-arg index="0" ref="dataSource"/>
<!-- 从数据库中查询信息的SQL语句,users是用户账号的表名 -->
<constructor-arg index="1" value="select * from users where {0}"/>
<property name="queryAttributeMapping">
<map>
<!-- user 是账户表的名称字段 -->
<entry key="username" value="user "/>
</map>
</property>
<property name="resultAttributeMapping">
<map>
<!—配置返回的字段信息:usertype是账户的类型 ,id是账户的id,roletype用于iPortal配置,即CAS用户属性字段 -->
<entry key="usertype " value="roletype "/>
<entry key="id" value="guid"/>
</map>
</property>
</bean>
上述代码中粗体字段的含义如下:
找到 class 为 org.jasig.cas.authentication.AuthenticationManagerImpl 的 bean,找到其<property name="credentialsToPrincipalResolvers">节点的<list>节点,修改<list>节点的
<bean class="org.jasig.cas.authentication.principal.UsernamePasswordCredentialsToPrincipalResolver" />
为:
<bean class="org.jasig.cas.authentication.principal.UsernamePasswordCredentialsToPrincipalResolver" >
<property name="attributeRepository" ref="attributeRepository" />
</bean>
返回属性信息还需要修改 CAS 目录下的 WEB-INF\view\jsp\protocol\2.0\casServiceValidationSuccess.jsp 文件,具体方法是在<cas:user>${fn:escapeXml(assertion.chainedAuthentications[fn:length(assertion.chainedAuthentications)-1].principal.id)}</cas:user>后面添加:
<cas:attributes>
<cas:test>test_value</cas:test>
<c:forEach var="auth" items="${assertion.chainedAuthentications}">
<c:forEach var="attr" items="${auth.principal.attributes}">
<cas:${fn:escapeXml(attr.key)}>${fn:escapeXml(attr.value)}</cas:${fn:escapeXml(attr.key)}>
</c:forEach>
</c:forEach>
</cas:attributes>
修改 cas\WEB-INF\spring-configuration\ticketGrantingTicketCookieGenerator.xml 文件,使得可以使用 http 协议的方式登录 CAS:将 CookieRetrievingCookieGenerator 的 p:cookieSecure 设置为"false"。
以上配置设置完成后,将 CAS 文件夹放置到 tomcat 的 webapps 目录里,启动 tomcat,此时可以访问 http://casserver:port/cas,用上面配置的 iportalusers 数据库中 users 表的用户账户登录 CAS。
iServer/iPortal/iEdge 从 9D 版本开始支持 CAS 5.x 单点登录,但由于 CAS 5.x 相较于 CAS 3.x 有较大的差异,部署方式也不同,且没有官方推出的 5.x 发行版,所以用户需要手动构建 war 包。CAS 的服务端搭建常用的方式有两种:
基于源码构建
使用 WAR Overlay 安装
官方推荐使用第二种,配置管理方便,后续升级也容易,因此此处也以 Windows 系统为例介绍使用 WAR Overlay 搭建服务的具体步骤。
由于 CAS 5.X 无发行版本,因此需要使用 Git 下载 CAS Overlay,在切换到下载目录后,输入以下 git 命令进行下载:
git clone -b 5.3 https://github.com/apereo/cas-overlay-template.git
下载完成后,目录下新增了一个名为 cas-overlay-template 的文件夹。
在数据库中创建数据库、表和帐号数据,用于 CAS 进行对 iServer/iPortal/iEdge 账号信息的管理。此处以 MySQL 数据库为例:
CREATE DATABASE `localmysql`;
DROP TABLE IF EXISTS `app_user`;
CREATE TABLE `app_user` (
`id` INT(11) NOT NULL AUTO_INCREMENT,
`username` VARCHAR(45) DEFAULT NULL,
`password` VARCHAR(45) DEFAULT NULL,
`role` VARCHAR(45) DEFAULT NULL,
PRIMARY KEY (`id`)
);
INSERT INTO `app_user` VALUES (1,'cas','1234567','admin');
为实现 iServer (或 iPortal、iEdge) 单点登录的对接,需找到 cas-overlay-template 目录下的 pom.xml 文件,增加依赖。
添加数据库的 JDBC 插件,在 pom.xml 增加如下依赖:
<dependency>
<groupId>org.apereo.cas</groupId>
<artifactId>cas-server-support-jdbc</artifactId>
<version>${cas.version}</version>
</dependency>
<dependency>
<groupId>org.apereo.cas</groupId>
<artifactId>cas-server-support-jdbc-drivers</artifactId>
<version>${cas.version}</version>
</dependency>
iServer (或 iPortal、iEdge) 和 CAS 之间遵循 SAML1.1 协议以实现票证验证响应,因此 CAS 需包含以下依赖来启用对 SAML1.1 的支持:
<dependency>
<groupId>org.apereo.cas</groupId>
<artifactId>cas-server-support-saml</artifactId>
<version>${cas.version}</version>
</dependency>
CAS 以 JSON 格式注册服务,因此需要包含 JSON 依赖包来实现对 JSON 的支持,如下:
<dependency>
<groupId>org.apereo.cas</groupId>
<artifactId>cas-server-support-json-service-registry</artifactId>
<version>${cas.version}</version>
</dependency>
iServer (或 iPortal、iEdge) 与 CAS 之间实现票证验证响应时,需要获取代表角色的字段(即前面表里的 role 字段)来验证拥有权限的类型,因此需要增加属性返回依赖包。
<dependency>
<groupId>org.apereo.cas</groupId>
<artifactId>cas-server-core-authentication-attributes</artifactId>
<version>${cas.version}</version>
</dependency>
至此,iServer/iPortal/iEdge 对接 CAS 需用到的依赖已添加完毕。使用如下命令进行打包:
mvn package
打包结束后,把打包生成的 CAS.war 复制到 tomcat 的 webapps 目录中 。
接下来修改配置文件,但要注意,此时还不能启动 tomcat。
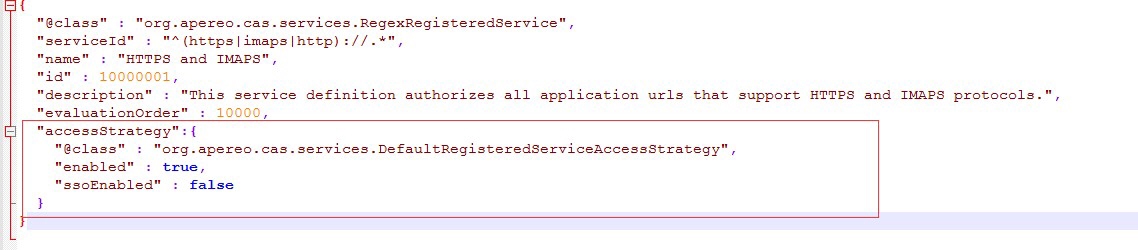
首先打开 cas \WEB-INF\classes\services 目录下的 HTTPSandIMAPS-10000001.json 文件,如下:
由 serviceId 参数可知,当前 CAS 只支持 https 和 imaps 这2个协议,还需增加 http 协议。如下:

增加注册服务的配置,如下:
增加返回所有的相关属性的配置,如下:
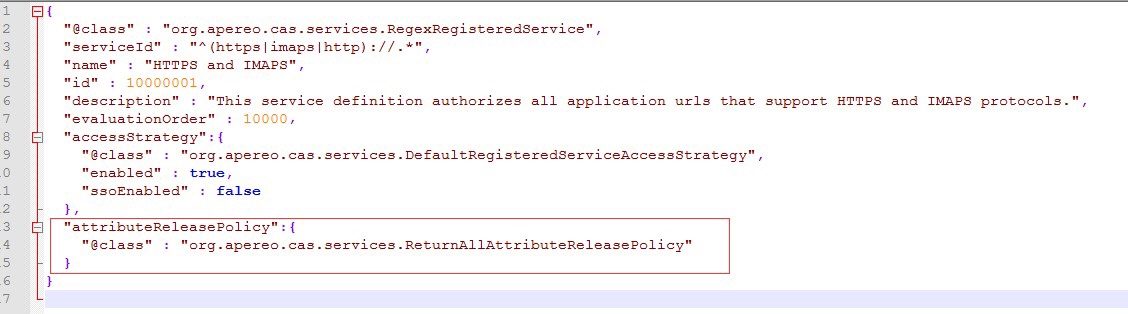
保存 HTTPSandIMAPS-10000001.json 文件。至此,完成对配置文件的修改。
在 cas\WEB-INF\classes 目录下新建 application.properties 文件,增加配置项,开启 JSON 注册服务,如下:
#开启json注册服务
cas.serviceRegistry.initFromJson=true
增加配置项,设置服务注册配置文件位置,如下:
#设置服务注册配置文件位置
cas.serviceRegistry.json.location=classpath:/services
增加配置项,增加数据库配置,以用于 CAS 服务器的登录(如不配置,将没办法使用 MySQL 中的用户名密码登录 CAS 服务器);其中 localmysql 为前面步骤创建的数据库名,app_user 为创建的表名,您需要替换为自己实际创建过程中的数据库名与表名。具体如下:
# JDBC配置
#数据库连接
cas.authn.jdbc.query[0].url=jdbc:mysql://localhost:3306/localmysql?useUnicode=true&characterEncoding=UTF-8&autoReconnect=true&useSSL=false&serverTimezone=UTC
#数据库dialect配置
cas.authn.jdbc.query[0].dialect=org.hibernate.dialect.MySQLDialect
#数据库用户名
cas.authn.jdbc.query[0].user=root
#数据库用户密码
cas.authn.jdbc.query[0].password=123456
#数据库事务自动提交
cas.authn.jdbc.query[0].autocommit=false
#数据库驱动
cas.authn.jdbc.query[0].driverClass=com.mysql.jdbc.Driver
#超时配置
cas.authn.jdbc.query[0].idleTimeout=5000
#查询账号密码SQL,必须包含密码字段
cas.authn.jdbc.query[0].sql=select * from app_user where username=?
#指定上面的SQL查询字段名(必须)
cas.authn.jdbc.query[0].fieldPassword=password
增加配置项,增加单行属性配置,作为CAS服务器票证验证时返回给客户端的字段(如不配置,将不能获取数据表中其他字段,比如,前文中的 role 字段),如下:
#单行属性
#开启单行属性
cas.authn.attributeRepository.jdbc[0].singleRow=true
#设置数据库表和cas服务器之间查询结果的映射关系,具体与数据库的字段名为准
cas.authn.attributeRepository.jdbc[0].attributes.username=username
cas.authn.attributeRepository.jdbc[0].attributes.password=password
cas.authn.attributeRepository.jdbc[0].attributes.role=role
cas.authn.attributeRepository.jdbc[0].order=0
#返回所有属性
cas.authn.attributeRepository.jdbc[0].requireAllAttributes=true
#查询所有属性字段的SQL语句
cas.authn.attributeRepository.jdbc[0].sql=SELECT * FROM app_user WHERE {0}
#指定上面的SQL查询条件
cas.authn.attributeRepository.jdbc[0].username=username
注意:
a. cas.authn.attributeRepository.jdbc[0].attributes 参数只是查询结果的映射关系,需以实际表结构为准,此处的表结果为 username、password 和 role 三个字段。
b. cas.authn.attributeRepository.jdbc[0].sql 参数只是 CAS 查询数据库时使用到的 SQL 语句,自由性很大,使用其他正确的查询语句也是可行的。比如数据库中以 2 个关联表的形式存储数据时,SQL 语句可写为:
SELECT app_user.*,gl1.* FROM app_user,gl1 WHERE app_user.test = gl1.test and {0}
其中,app_user 表和 gl1 表通过 test 字段关联。
完整的 application.properties 如下:
#开启json注册服务
cas.serviceRegistry.initFromJson=true
#设置服务注册配置文件位置
cas.serviceRegistry.json.location=classpath:/services
# JDBC配置
#数据库连接
cas.authn.jdbc.query[0].url=jdbc:mysql://localhost:3306/localmysql?useUnicode=true&characterEncoding=UTF-8&autoReconnect=true&useSSL=false&serverTimezone=UTC
#数据库dialect配置
cas.authn.jdbc.query[0].dialect=org.hibernate.dialect.MySQLDialect
#数据库用户名
cas.authn.jdbc.query[0].user=root
#数据库用户密码
cas.authn.jdbc.query[0].password=123456
#数据库事务自动提交
cas.authn.jdbc.query[0].autocommit=false
#数据库驱动
cas.authn.jdbc.query[0].driverClass=com.mysql.jdbc.Driver
#超时配置
cas.authn.jdbc.query[0].idleTimeout=5000
#查询账号密码SQL,必须包含密码字段
cas.authn.jdbc.query[0].sql=select * from app_user where username=?
#指定上面的SQL查询字段名(必须)
cas.authn.jdbc.query[0].fieldPassword=password
#单行属性
#开启单行属性
cas.authn.attributeRepository.jdbc[0].singleRow=true
#设置数据库表和cas服务器之间查询结果的映射关系,具体与数据库的字段名为准
cas.authn.attributeRepository.jdbc[0].attributes.username=username
cas.authn.attributeRepository.jdbc[0].attributes.password=password
cas.authn.attributeRepository.jdbc[0].attributes.role=role
cas.authn.attributeRepository.jdbc[0].order=0
#返回所有属性
cas.authn.attributeRepository.jdbc[0].requireAllAttributes=true
#查询所有属性字段的SQL语句
cas.authn.attributeRepository.jdbc[0].sql=SELECT * FROM app_user WHERE {0}
#指定上面的SQL查询条件
cas.authn.attributeRepository.jdbc[0].username=username
#数据库连接
cas.authn.attributeRepository.jdbc[0].url=jdbc:mysql://localhost:3306/localmysql?useUnicode=true&characterEncoding=UTF-8&autoReconnect=true&useSSL=false&serverTimezone=UTC
#数据库dialect配置
cas.authn.attributeRepository.jdbc[0].dialect=org.hibernate.dialect.MySQLDialect
#数据库用户名
cas.authn.attributeRepository.jdbc[0].user=root
#数据库用户密码
cas.authn.attributeRepository.jdbc[0].password=123456
#数据库事务自动提交
cas.authn.attributeRepository.jdbc[0].autocommit=false
#数据库驱动
cas.authn.attributeRepository.jdbc[0].driverClass=com.mysql.jdbc.Driver
#超时配置
cas.authn.attributeRepository.jdbc[0].idleTimeout=5000
至此,CAS 5.X 的配置完成 。